
"Gates on my Journey" was made for the 2012 design Challenge
sponsored by the New Metal Artists of Los Angeles

I decided I couldn't live without a copy of "Wind Swept" for myself. So I took my little baby to my wonderful casters. We all thought it would be done at the end of the week, but it took almost a month. Turns out, it was really hard to mold and cast because it's so delicate.
I added all the bezel cups. Funny how simple that sentence is, when soldering on all the bezel cups really put my soldering skills to the test. I soldered on 8 fine silver bezel cups ranging from 4mm to 6mm. Then I custom made and added 2 7mm cups for the pretty Peridots. All in all 10 bezel cups for 10 little gems.


I was able to spend some time in my studio today and I'm thrilled with the results. I finished the "Queen of Hearts" crown. You can find more info on this crown's progress in this past post.
 This did not come out of the kiln as nicely as "Wind Swept". I had to make some minor repairs, BooHoo. But all these repairs went extremely smoothly. And I'm really happy with how it turned out.


...when you think, "I just shouldn't have gotten out of bed today"? Well that's the day I had yesterday. I was going to spend the whole day working on my Wind Swept and Queen of Hearts crowns, only to discover I was out of 4mm bezel cups. No problem, I'll just pop downtown and get some. Two hours and many miles later, it turns out you can't buy a silver bezel cup in the jewelry district in down town LA. WHAT!! Amazing but true. Did I mention that it was boiling out and all those miles were on foot?
The trip wasn't a complete loss, I popped over to the garment district, and got some wonderful trim you'll see in a future project.
I'd hoped to have a lot more progress to show, but at least I have this to share. I hope you enjoy.
 I'm pretty sure this will be a double crown, it can be worn backwards or forwards. I really like to do this, if I can. Sometimes, I make them so they can be worn upside down and right side up, but for this one, the back will be a second front, so here's the back.
 I feel like the asymmetry really held up when the crown was bent round. And the PMC pro bent beautifully. I love the tall simple back in comparison to the swirling front. It all seems to work together really well. I'm so happy.
You'll have to imagine the Peridot, Adventurine, Moonstone, and Amethyst stones sprinkled throughout the crown, because you can't buy a silver bezel cup in the Jewelry District, the Jewelry District. I could've bought a diamond the size of my fist but I can't buy a silver bezel cup. Okay, okay, sorry, rant over.
Queen of Hearts has some issues that I decided my luck was not up to yesterday. But I'll tackle them soon and show an update on the Queen of Hearts, maybe next week.
Oh and by the way, I also melted a ring in the kiln that I've been working on for about two weeks. I just shouldn't have gotten out of bed yesterday.
Well...let me tell you....crowns, two crowns, to be exact. These crowns are more than likely going to be my entries for this year's PMC Annual, so they have to be finished by the end of the month. I'm feeling confident that I can get them done in that time frame, but I've got a lot of work between now and then.
The first already has a home. I'm trading this crown with a women in Sweden and I'll share the wonderful thing I'm trading for, when it gets here. For now you'll have to be happy with the crown.


This is just a quick post to share my new filigree crown. I made it from sterling silver wire and bezel cups. The focal bead is a Blue Lace Agate and the smaller stones are all Moonstones. The dangles are sapphire Swarovski crystals.

 I love how delicate and romantic it is and of course I wanted it to feel vintage, which I think it does. This was my first large scale filigree project and I'm really happy with how it turned out.
I've added this crown to my newly re-opened etsy shop. I don't have much in there at the moment, but I really love what I do have in the shop. Thank you for sharing my journey with me.
I'm so happy with how this set of Warrior Elf Queen Antlers turned out. The person who ordered this pair wanted a wider stance on the antlers and I love love love how they look like this. They seem more "wild" somehow with this wider stance. I find it so interesting to see my work re-interpreted by someone else. It was a joy to work on this project and I hope their new owner is as happy with them as I am.
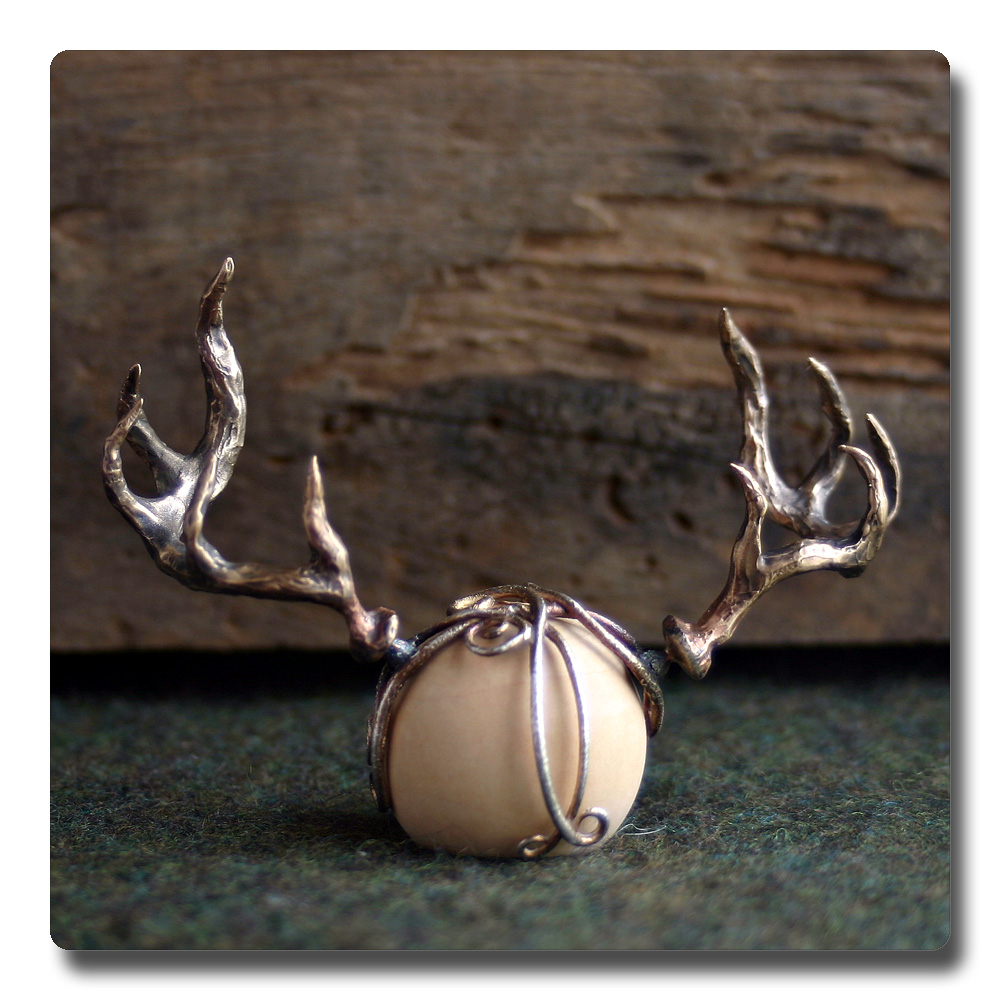

So the next little step was to build the Pedicle for the head dress. What's a pedicle you ask? Excellent question. The pedicle is the bony growth that connects the antler to the head bone of the animal. In our case they attach the antlers to the head piece.
 Then they are connected to the head piece and become down right adorable.
I just wanted to share a little of the process I use to build the Elf Queen Warrior, head dress. I use Silver Metal Clay and roll out snakes to create the shape. I create this shape flat.
This piece goes into the kiln at 1650 degrees Fahrenheit for 2 hours. When it comes out I carefully bend it into the head shape. And hammer a bit to work harden it.
Next I'll show you how I add the horns.
I've sent off my first pair of Marie's Shoes. And in getting them ready to go I discovered a little design flaw. The shoes wouldn't stay on the "feet" unless they were touching the ground. This really would have limited the posing that could have been used for the shoes. So I did a little redesign and added a strap across the back of the shoe. I really love how it looks.
The strap is satin with Freshwater pearl embellishment and button closure. I think it looks really cute and period accurate to boot.
I'm sure that if I had a doll I would have caught this problem a long time ago. But because I've never "played" with my shoes I didn't bump into this issue until I was photographing the shoes with the "feet" in them. So all I can say is; I obviously need a doll...Right?
I love silver. Not as an alternative fine metal, but for itself, I love silver. So when I design I always gravitate towards silver. I made my original Elf Queen Antlers in, what else, silver. And I love them. But... someone ordered a set of antlers in bronze and when I got them from the casters I was shocked to find that I am torn between my beautiful silver pair and these new bronze ones.
 The bronze is so beautiful. They look so natural and timeless. I really didn't think I would be so blown away, but I am. And it just goes to show you, you have to be open to new materials and techniques as an artist, or you could be missing out.
I'm actually a lot farther along on the bronze antler headpiece, but I wanted to share the pleasant shock and awe I experienced working with bronze. I'll share more pictures soon.
As you may have noticed. I love to craft. I really do. But I must admit that I have a bit of a favorite child. Metal Clay jewelry making. I know we aren't suppose to pick favorites, but there it is for the world to read. I want to share some of my work to date with you.
Bronze Clay dome earrings. Really simple.
Silver Clay, denim quartz, and aquamarine beads.
Ammonite bezel set with fine silver bezel wire. Silver clay hollow form beads. I love this necklace. It was inspired by a Thomas Mann piece I saw in a Venice Gallery. You can also see Marsha Thomas' beautiful photo of this piece at the top of my blog.
Silver clay, gold foil, fine silver cloisonne wire, and leaded enamels. This piece was inspired by Klimt's "Tree of Life" and I call mine "Tree of life". I know, step back imagination at work.
This pendent is a little unfinished. Two holes and a chain...so close. It's silver clay, fine silver bezel, and a turquoise cabochon.
This was a gift to a friend. The fleur-de-lis is silver clay and the choker is made of czech glass beads. I re-strung this twice to get it right. Why is simple so hard?
And this is Lucinda. I love her. She is one of my first cloisonne enamel projects using metal clay. She is silver clay, fine silver cloisonne wire and leaded enamels. She makes me smile to this day.
Thank you all for visiting during the birth of this blog. And now you have seen something Hammered, something Stitched, and something Burned. And bells start ringing. Thank you all so much for your support. I would not have gotten this far without you. You know who you are.

